
 That's right! I'm about to walk you thru not one, but TWO paintings I just did this week. You can all thank Scott Hume (www.humedex.blogspot.com) for dropping the idea into my noggin'.
You can actually see the sketches for these pieces, "Red Metal Rush" and "Metro Girl," in a previous post. I painted both of these 8x8" wonders simultaneously, so that's how I'll do the walk-through.

 I started with a medium purple undertone, and built up the layers from there. I'm a big fan of texture, so my first step was adding some collage elements to both canvases. I took a more "live art" approach with the beginning of these. After figuring out my image, I was drawing shapes with paint, then drawing out the finer details in pencil on top of that. All the while, I was building up paint layers, deciding on undertones, and such.
 The paint layering continued from there. I deepened the Metro Girl's skintone. I'd originally wanted her to be more of a Pacific Islander, with dark features and brilliant blonde hair. You can see how I added a lighter tone for her sweatshirt, and dropped in a base red for her skirt. And the Red Robot got a more aggressive paint job, with bright reds for his iron body. I also added a fiery tone to the sky/background. I just wanted to nail the basic shapes... the backbone, if you will.
 By the next step, things have really started to take form. Finer details on "Metro Girl" were dropped in. I'd started to noodle on things like the print of her skirt and shoulder bag. I'd painted in the highlights of her skintone, including blush. She went Caucasian all of a sudden, but hell, that's just how it turned out. Also, note the detail on the earrings and the start of the skyline underpainting near the upper left corner. Oh, and I'd really figured out what tones I wanted to use in the background.
"Red Metal Rush," also grew in leaps and bounds from the last stage. I'd carved out even more of the red-metal detail, and accented it with bright white highlights. I also started playing with the steamy background, with some of the fluffy clouds bursting from the Robot's pipes.

 At this point, I was very close to the end. In fact, "Red Metal Rush" was done! As you can see, I'd punched up the steam elements. White, puffiness exploded from his exhaust pipes. And I added dashes of white streaks, to illustrate the Robot's "rush" toward his mechanical goal. I'd also gone in with that most final of steps, the ink drawing. With pieces like this, I like to tighten things up with black lines, but still let the rough underpainting show. There's a lot of work and eye-candy in the early stages of a painting, and I enjoy letting each layer of that shine through to the top.
"Metro Girl" was also fairly finished at this level. I'd done up lots of little details... red and green highlights were painted in to help move color throughout the piece, and thus, the viewer's eye. I'd added all sorts of splatter texture to the green background. Her boots and belt were noodled in. And the cityscape became more definite, with two tones building up its basic shapes.
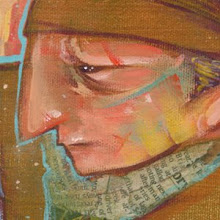
 Last but not least, I gave "Metro Girl" the ink treatment. With this sort of piece, though, I like to preserve the softer, color line work. So you'll see that some of her facial features remain uninked. I'd added some flower shapes in the background. The cityscape was finished very loosely. A lot of the ink drawing on this one was added in a live art fashion. For me, that's all about marrying the black ink lines with the lines and shapes created by strong, bright colors. As someone who draws comics and paints illustrations, it's a lot more interesting for me to pull from all my skill reserves, rather than rely on one or the other. A big part of making art is keeping it fun for yourself, ya know? Nobody likes to be bored on the job!
And that's that. You can see both of these pieces at Fabric8 (at least, until they sell) down in San Francisco's Mission District. See the flyer below for all the info.

I'll be painting more in the days and weeks to come, so look for more of the freshness on here soon.
-Bunker, iggety-out!


2 comments:
oh man this is awesome, thanks for sharing man, really cool to see the process and how it all comes together , I espically love how red metal rush come out, lovin the steam, great work as always dude.
oh and thanks for the blog plug man, I better start updating more..haha.
Hell yeah, Scott! I'm glad you dig the process. It's fun to "pull back the curtain" and show people how I do this stuff. And I'm always flattered by the interest.
For sure, there'll be more of these posts as I make more and more fine art pieces.
Hail to The Weird,
-Dave
Post a Comment